For many musicians, creating the perfect sound involves a myriad of complex variables.
One effective tool for shaping your tone is the often undervalued compressor pedal.
This piece of equipment could be the answer to your need for a consistent, controlled audio output.
When used correctly, it can add a professional polish to your music.
Grasping its optimum utilization, however, can be a challenge.
In this article, we’ll explore proven strategies for exploiting its full potential.
Table of Contents
- Strategies For Using A Compressor Pedal Effectively
- 1. Adjust attack level for tone enhancement/softening.
- 2. Set a High Ratio for Limiting
- 3. Fine-tune Compression Using Make-up Gain.
- 4. Use low ratios for light compression.
- 5. Increase Sustain with Long Release Times
- 6. Use with Distortion for Increased Sustain
- 7. Experiment with Knee Control for Smooth Transitions
- 8. Blend Dry and Wet Signal
- 9. Use Peak Reduction for Dynamic Control
- 10. Use threshold control carefully for noise reduction
- 11. Set a low threshold for heavy compression
- 12. Employ Side Chain for Frequency-Specific Compression
- 13. Use Auto Mode for Consistent Sound
- 14. Combine with EQ for tonal shaping
- 15. Use multiband setting for specific frequency compression.
- The Bottom Line
Strategies For Using A Compressor Pedal Effectively
1. Adjust attack level for tone enhancement/softening.
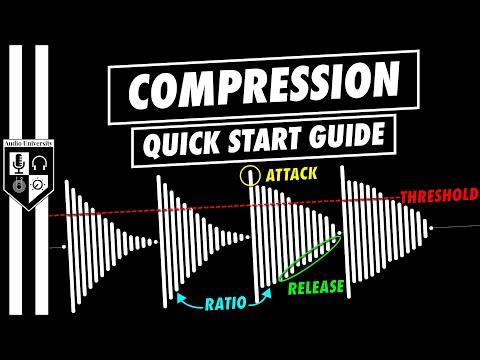
When considering the strategies for using a compressor pedal effectively, understanding the function of the attack level is crucial.
Essentially, the attack control determines how fast the compressor reacts once the input signal exceeds the set threshold.
Adjusting the attack level appropriately can result in either enhancement or softening of the tone, allowing you to shape the transients and sustain of a musical note.
While a fast attack can make your tone aggressive by clamping down hard on initial transients, a slow attack setting lets some transient through before the compression kicks in, thus helping to keep the sound more natural or giving the effect of a string being plucked hard.
In essence, the attack control of your compressor pedal is a valuable tool in allowing you to shape the tonal characteristics and dynamics of your sound, whether you’re aiming for a punchy, bright tone or a smoother, more mellow sound.
This quoted statement emphasizes the fact that the attack control is not just a set-it-and-forget-it feature.
If you want to achieve a punchy tone, you can set the attack faster, which will make the compressor act quicker to reduce the transient peak.
Alternatively, for a smoother tone, slowing down the attack can let more of the initial transient through before the compressor starts to work, thereby preserving some of the natural dynamics of the sound.
One thing to remember is that the attack control interacts closely with the threshold and ratio settings.
This is because these settings determine when the signal will cross the threshold that triggers the attack and how much compression will be applied thereafter.
As such, experimentation and careful listening will be required to find the best attack setting for any particular situation.
In the embedded video, you’ll encounter practical demonstrations of how adjusting the attack control can significantly influence the tone and feel of your guitar sound.
You’ll also get to see real examples of the different tonal and dynamic effects that can be achieved with different attack settings.
Finally, keep in mind that there is no one-size-fits-all setting when it comes to the attack control on a compressor pedal – or indeed any other aspect of compressor pedal use.
What works best will depend on the specific requirements of the music, your personal taste, as well as the characteristics of your guitar and amp.
As always, the ultimate aim should be to use the attack control – and the compressor pedal as a whole – in a way that enhances your sound and helps you to better express yourself musically.
2. Set a High Ratio for Limiting
When it comes to using a compressor pedal effectively, one crucial strategy involves setting a high ratio for limiting.
This technique is fundamental in managing the dynamics of your guitar sound and preventing audibility issues.
The ratio on a compressor pedal essentially enables you to control the amount of compression you wish to apply to your audio signals.
Therefore, understanding how to tweak the ratio for desired effects is crucial to achieving a balanced, well-compressed sound.
By setting a high ratio, you’re instructing the pedal to compress the signals more aggressively once they surpass the established threshold.
Setting a high ratio for limiting, in simpler terms, reduces the dynamic range drastically, thereby providing a more uniform sound.
By doing this, you effectively limit the loudest parts of your sound while enhancing the quieter parts, thus maintaining a consistent volume across your audio output.
This method can prevent significant peaks that often result in sound distortion.
Given the aggressive nature of this approach, it’s critical to use this setting for genres or styles that require a more powerful, weighty sound.
Keep in mind that setting the ratio too high could lead to a loss in musical dynamics, potentially jeopardizing the quality of your guitar sound.
This strategy is often referred to limiting, which is why you need a high ratio to effectively achieve it.
It’s essential to note that each genre or style of music requires a specific setting for optimal results.
Therefore, while high ratios work best for certain rock and heavy metal styles, it might not be ideal for softer, more mellow sounds.
Always remember that the key to a perfect guitar sound is a combination of a good understanding of techniques like limiting and the ability to fine-tune your compressor pedal settings to fit the desired sound characteristics.
A common practice is to set the ratio high when dealing with problematic or overly dynamic audio signals.
However, it’s essential to start with a moderate ratio before gradually increasing it to avoid excessive compression.
Remember, tweaking the ratio is not only a science but also an art.
The more you understand the nuances and the physics of sound compression, the better you’ll become at using a compressor pedal effectively.
Exploring the full spectrum of possibilities and unique sound characteristics that come with different ratio settings can significantly broaden your musical prowess and enable you to achieve more refined sound textures.
Overall, setting a high ratio for limiting is a powerful tool in your guitar sound arsenal that can drastically shape and refine your sound.
Although it requires careful calibration, it’s a technique worth mastering for the sheer range and versatility it offers.
Always remember that how you use this technique will largely depend on your individual sound preference and the particular style of music you’re playing.
3. Fine-tune Compression Using Make-up Gain.
As an integral part of using a compressor pedal effectively, you need to understand the importance of the ‘make up gain’ function.
Essentially, this feature helps in re-balancing the output level of your guitar signal after applying compression.
When you compress the signal, you’re effectively reducing the dynamic range by lowering the volume of loud sounds.
The ‘make up gain’ comes into play by amplifying the compressed signal back up to an appropriate level.
Understanding how to fine-tune this aspect of your compressor pedal can make a significant difference in the overall tone and quality of your sound.
‘Make-up gain’ ensures that your signal output is not lost after applying compression, and it brings the signal level back to more desirable amplitude.
This quotation indicates that by masterfully using the make-up gain function, you can preserve your signal’s output and maintain the intended amplitude.
Proper adjustments can alsos keep the powerful and dynamic characteristics of your performance intact.
The process of carefully adjusting the make-up gain, while it can be subtle, does require a careful ear to strike the right balance.
This underscores the importance of taking the time to properly learn how to use this control effectively.
Watching the embedded video can illuminate this topic further, providing practical demos and useful tips.
It could help you better understand the way make-up gain works in the context of overall compression.
When done right, fine-tuning compression using ‘make up gain’ can lead to a much more consistent and balanced sound from your guitar.
Remember, the key to effective use of a compressor pedal is not just about knowing which knobs to turn, but understanding why and how they affect your sound.
By mastering the art of using make-up gain, you will be able to tweak your compression settings not just technically, but also musically.
Ultimately, this is what makes the difference between a good guitar tone and a great one.
4. Use low ratios for light compression.
When using a compressor pedal for your guitar, understanding compression ratios is essential.
The ratio can determine the level of restraint you’ll apply to your sound.
Different genres of music call for different compression ratios.
Typically, singers/songwriters or folk musicians will use lower ratios to subtly balance their dynamics.
The ratio of compression is the difference in dB between the input signal level and the output signal level.
For example, at a 2:1 ratio, for every 2 dB above the threshold we input into the compressor, we get 1 dB output.
Light compression usually involves a ratio of between 1.5:1 and 2:1. This means that for every 1.5 or 2 dB that the input signal goes over the threshold, the compressor reduces the output by 1 dB.
Low ratios are perfectly suited for light compression and can give your sound that much-needed control without making it seem over-processed or unnatural.
Low ratios can soften a slightly dynamic performance without making the compression noticeable.
The idea is not to eliminate dynamics, but to control them.
So, using a low ratio can create a natural and open sound that breathes with the dynamics of the performance.
It maintains the dynamic range but prevents the peaks from becoming too loud.
Many compressor pedals operate in a more transparent fashion at lower ratios, making them the go-to choice for consistent light compression throughout a performance.
Also, by using a low ratio you can compress a signal lightly over a wide range of input volumes without causing any distortion.
The key to achieving a good tone with compression is balance.
Too much compression will sound too controlled, and not enough will sound too loose.
In some cases, and with some playing styles, even a 2:1 ratio may start to ‘squash’ your sound too much, so careful adjustment is necessary to maintain a natural tone.
With the compressor set to a low ratio, you can still attain a desirable amount of sustain without killing your dynamics or drastically altering your tone.
Applying just the right amount of light compression can give you a clean, balanced sound and leave your performance feeling incredibly smooth and natural.
Remember that using a low compression ratio does not make your sound worse or better, it is based on what you need for the specific environment you are playing in.
Ultimately, experimentation is key in finding the perfect sound for your performance; consider starting with a low compression ratio and adjust as needed.
5. Increase Sustain with Long Release Times
In the realm of playing guitar, understanding how to increase sustain is one of the keys to creating a more profound and powerful sound.
The concept of ‘sustain’ refers to the length of time that a note resonates before it starts to fade away.
One of the techniques to increase sustain involves utilizing long release times when tweaking your compressor pedal settings.
The release control on a compressor pedal dictates how long the compressor takes to stop compressing after the input signal falls below the set threshold.
In essence, the release time impacts the dynamic response of your guitar’s sound.
Release time setting requires a delicate balance – if it is set too quick, you might experience a choppy sound, on the other hand, if the release time is set too long, it may not release the compression in time for the next note or phrase.
This quote underlines the significance of the release time in shaping the sustain effect.
It’s a matter of finding the ‘sweet spot’ that gives your notes just the right amount of lingering resonance.
Hence, experimentation is key.
By setting a longer release time on your compressor pedal, you’re essentially permitting the pedal to apply its compressing effect over an extended duration.
This, in turn, allows the note to retain its volume level for a more extended time period, boosting the sustain.

If you choose to watch the video above, learn more about techniques for manipulating your compressor pedal to increase sustain.
Experiment with different release times to experience first-hand how this impacts your sound.
It is worth noting, however, that using longer release times can bring about a particular coloration to your tone.
This effect could be desirable, and many guitarists actively seek it, but it’s important to be mindful of how these settings can impact the overall tonal balance of your sound.
With guitar playing, the desired tone and effects are often a matter of personal preference.
Thus, there are no absolute rules when it comes to setting your compressor pedal.
It’s also constructive to remember that while longer release times can be effective for enhancing sustain, it’s not the only factor at play.
Other settings such as the attack, ratio, and the threshold also work in synergy, each contributing to how your compressor pedal molds the sound.
In the end, the practical approach is to spend time experimenting with your compressor pedal, playing around with different settings till you strike the right balance that suits your playing style and delivers your desired sound.
Increasing sustain with long release times is one of the many strategies you can employ for using a compressor pedal effectively.
It may take practice, but the outcome can be incredibly rewarding and quite worth the effort.
6. Use with Distortion for Increased Sustain
Understanding the concept of sustain is vital when learning how to effectively use a compressor pedal.
Sustain is the length of time for which a note or chord rings out after being played.
When using a compressor pedal in combination with distortion, your aim is to extend the note’s decay, thus increasing the sustain.
Distortion pedals alone can add a level of sustain, but combining them with a compressor pedal will significantly enhance this effect.
The combination of a compressor pedal and distortion leads to a considerable increase in sustain, which is an essential tool for many styles of playing – particularly in genres such as blues, rock, and metal.
This fusion of effects results in a controlled, harmonically rich sound that can make your guitar solos and lead lines more powerful and expressive.
However, getting the balance right between distortion and compression can be tricky.
It’s a delicate dance, and it’ll require a lot of practice and tweaking.
The key is to keep the distortion from overpowering your sound while still allowing the compressor to do its job.
In this context, especially, the order of your pedals becomes immensely important.
Typically, guitarists will opt to first plug into the compressor, allowing it to even out the dynamics, before moving onto the distortion pedal.
This generally results in smoother sustain, more manageable clipping and less noise.
On the flip side, having the distortion before compression will often result in a more aggressive tone, and the compressed signal might lose some of its dynamic range.
Ultimately, the order in which you arrange your pedals will depend heavily on personal preference and the specific tone you are aiming to achieve.
It’s worth noting that compressor pedals alone won’t create sustain out of thin air.
They work by increasing the volume of quiet sounds and decreasing the volume of loud sounds which has the effect of making notes ‘hold’ for longer.
When used in concert with a distortion pedal, this effect is amplified greatly.
It is imperative to experiment with the settings of both pedals to find your desired sound.
The type of distortion pedal you use, as well as guitar and amplifier settings, will also make a difference.
This is just one of the ways you can use a compressor pedal effectively for creating a dramatic sustain.
Remember, subtlety is key when integrating multiple effects.
In the realm of guitar playing and tone crafting, patience and experimentation often yield the most interesting and unique results.
7. Experiment with Knee Control for Smooth Transitions
One of the most crucial aspects of mastering a compressor pedal is understanding how to utilize the knee control.
Essentially, this tool allows musicians to manage the transitioning threshold between uncompressed and compressed signals, thus resulting in smooth, musical transitions.
As a user, you are given the freedom to dial it in depending on the desired sharpness and severity of the compression onset.
You have the option to use a soft knee, which offers slow compression that begins before the threshold and increases softly.
This seamless increase enables more natural, unobtrusive compression with little to no signal degradation.
On the other hand, a Hard knee rapidly induces full compression once your signal exceeds the threshold.
This results in a sudden and noticeable signal reduction, making it perfect for controlling peaky audio signals.
Despite being more noticeable, this technique comes handy when aiming to tame transients or rapidly varying signal levels.
Knowing when to use each type of knee control can significantly influence your aural results.
For an even better understanding of how knee control works, the video above will take you through a detailed explanation and demonstrate its actual application.
By viewing the video, you will gain practical insight into using the knee control feature, as well as tips and tricks on how to achieve the best results with your sound.
Unquestionably, tweaking the knee parameter is a powerful way to control the dynamics of your sound.
However, it should also be noted that overzealous use of the knee control may lead to over-compression, potentially breeding unwanted noise and unnatural sound artifacts.
The key to proper knee control lies in careful adjustment and acute listening.
Make sure to experiment with different settings and listen closely to the results, this will help you understand the enhancements or changes brought about by different knee control adjustments.
While knee control is just a small part of the compression equation, it certainly plays a pivotal role in sound control and manipulation.
Thus, by taking the time to understand and experiment with this feature, you will be able to use your compressor pedal more effectively, achieving the exact tone and dynamic range you desire for your music.
8. Blend Dry and Wet Signal
When utilizing a compressor pedal, a key strategy to consider is blending the dry signal (the original, unprocessed sound) with the wet signal (the sound that has been modified by the effect).
This technique, known as parallel compression, is a commonly used method in both live and studio settings to add depth and character to your sound without compromising the integrity of the original tone.
The objective here is to achieve a balanced blend that complements each component of the sound while maintaining the dynamics of the performance.
The art of parallel compression lies in finding the right balance between the dry and wet signal, which enhances the overall tonal quality and gives your sound an edge.
This is due to the blending process involving not only correct magnitude setting but also careful tuning of the effects parameters.
It is vital, to avoid a collision of frequencies, which may cause muddiness, or to neglect compatibility, which may result in flatness.
The dry signal provides a touch of transparency and preserves the natural dynamic range.
On the other hand, the wet signal influences the tone by controlling the attack and shaping the sustain to ensure a more produced sound.
By keeping these aspects in mind while blending, it becomes possible to obtain a sound that has the advantage of both the dry and wet signals, enhancing the overall experience.
Also, remember that the blend does not have to be equal.
Sometimes, a more subtle effect can be achieved by mixing a slight amount of wet signal with the dry, or vice versa.
Being open to experimentation will lead to discovering configurations that best suit the music and personal style.
Effective blending comes with practice and involves a lot of trial and error until you arrive at the perfect mix that adds the right flavor to your sound.
The merit of parallel compression lies in its flexibility; it can be used for softening harsh tones or even bolstering weak signals to create a larger-than-life effect.
Crucially, while setting a proper blend of signals, it serves to minimize distortion and other unpleasant artifacts that may arise.
When done correctly, the blend of dry and wet signal can effectively enrich the sound and makeup of a performance, lending it a unique texture and depth otherwise not attainable.
Lastly, always remember, blending is a continuous process.
It’s a case of finding the optimal blend to suit each song or even certain sections within one song.
In other words, don’t consider a set blend as a one-size-fits-all solution but rather an ongoing, adaptable process.
9. Use Peak Reduction for Dynamic Control
Within the audio engineering realm, one fundamental tool you use to control the dynamic range of your sound is peak reduction.
Providing you with the power to manage sharp, high amplitudes that could distort the sound and damage your speakers, peak reduction is a feature common in many compressor pedals.
Peak reduction, also known as peak limiting, works by limiting the amplitude of a waveform to prevent it from exceeding a specific level.
Dynamic control is crucial in ensuring an output that is clean and balanced, with clearer articulation of the musical notes without any distortion.
Proper utilization of peak reduction in a compressor pedal can make a drastic difference in maintaining the quality of the output sound.
Working with peak reduction, it’s important to understand, is a balancing act.
Too much reduction can suppress the vibrancy and liveliness of your sound.
Effectively using peak reduction therefore requires a keen ear and a knack for preserving the natural dynamics of your performance while also preventing distortion.
Bearing in mind that each musical scenario requires different settings, mastering these controls might take some patience and practice.
This video can serve as a helpful, visual guide, demystifying the process of using peak reduction in a compressor pedal.
By watching it, you can gain an appreciable understanding of this technique’s application in practical scenarios.
Pushing your limits and experimenting with different settings can ultimately lead to more refined control over your sound.
Remember, peak reduction is not an independent control.
It is intrinsically linked with other compressor settings.
The attack, release, threshold, and ratio parameters of your compressor should work in harmony with peak reduction, creating a harmonically rich and balanced sound output.
Understanding the interaction of these controls is paramount to effecitvely employ your compressor pedal, and ultimately, to evolve as an astute audio engineer.
It’s a learning curve that demands your time and commitment, but taking this route is well worth the effort.
10. Use threshold control carefully for noise reduction
When operating a compressor pedal, threshold control is one aspect that should always be given the utmost attention.
This is because it is linked directly to the noise reduction capability of the device.
The threshold parameter of a compressor determines at what input level the compression will start to take effect.
Since the level of input signal varies, it’s vital to adjust the threshold according to the specific situation.
The key to effective threshold control lies in striking a balance; setting it too high may make the compressor ineffective, while a too low setting might lead to excessive noise.
Going by this, it is clear that the use of threshold control requires skills and precision.
Attempting to reduce the noise level by simply lowering the threshold can create a noisy output.
This is a result because the compressor will start working on quieter parts of the signal, unintentionally amplifying noise or unwanted sounds.
It’s crucial that the threshold is set at a level where it only affects the loudest parts of your sound.
The idea is to compress only the peaks of the signal without tampering with its tone or causing unwanted noise.
The beauty of cautious threshold usage for noise reduction lies in its ability to preserve the dynamics of your sound; instead of your track sounding squashed or over-processed, it maintains its natural dynamics, giving you a cleaner mix.
Threshold control can also help improve the consistency of your sound levels.
It achieves this by helping to cut down the variations in volume, making your sound blend better together while still retaining its natural dynamics.
To use threshold control effectively, understanding the dynamics of the sound source is key.
It eliminates guesswork, allowing you to set the threshold to cut off at the right points.
This does not only give you a cleaner mix, but it also helps maintain the originality of your sound.
Another point worth noting is that the threshold settings may vary based on the type of music or instrument.
Hence, it’s a good practice to make adjustments based on your musical content or the instrument you are recording.
Using threshold control carefully and effectively is a vital strategy for noise reduction when using a compressor pedal.
An improper threshold setting can result in an undesirable output, highlighting the need for careful and strategic usage.
While it might be tricky at first, constant practice can help you gain mastery over threshold control.
With time, you will understand how to adjust the threshold to suit different sources and more effectively reduce noise.
Using threshold control effectively will not only result in improved sound quality but overall enhanced musical performance.
It is a skill worth mastering in using a compressor pedal to its fullest potential.
11. Set a low threshold for heavy compression
Understanding the relationship between threshold and compression is crucial when using a compressor pedal in music production.
The threshold on a compressor pedal is the level at which the compression kicks in and starts to affect your signal.
By setting a low threshold, you instruct the compressor to engage when the signal’s volume is relatively low.
This results in more compression applied to your sound, leading to more dynamic range control.
When heavy compression is desired, it’s often accomplished by setting a low threshold.
A lower threshold means that the compressor will start working earlier in your signal, leading to a higher level of compression.
A lower threshold, hence more compression, may be particularly useful in genres where tighter control of the sound’s dynamic range is crucial, like metal and rock.
For instance, aggressive rock music often requires a highly controlled dynamic range to maintain power and drive in the mix.
Therefore, setting a low threshold to achieve heavy compression might be your go-to strategy in these cases.
However, too much compression can strip away dynamics and make your track feel flat, so be sure to use this feature wisely and tactfully.
Striking the right balance between maintaining dynamics and controlling the dynamic range is essential for achieving the desired sound.
In this comprehensive video, you’ll learn more about how the threshold works in a compressor pedal and how you can use it to shape your sound effectively.
You’ll also get practical examples of using low thresholds for heavy compression and its impact on different genres.
Keep in mind that experiences may vary greatly depending on the specific compressor pedal and the overall setup you’re using.
So, make sure you spend enough time experimenting with different threshold settings and their effect on your sound on your particular gear.
And remember that understanding how to effectively use a low threshold for heavy compression is an important part of mastering the art of guitar compression, aiding you in producing the sound you have envisioned.</p
12. Employ Side Chain for Frequency-Specific Compression
Side chain compression is a popular technique in music production, used to create a ducking effect that prevents certain frequency ranges from overriding others and causing a jumbled, messy mix.
In a guitar context, when a compressor pedal is equipped with a side chain feature, it allows for frequency-specific compression, meaning that only chosen frequencies will be compressed while others will remain unaffected.
This can prove invaluable when attempting to achieve a balanced sound without sacrificing the presence of any elements in your guitar tone.
Not all compressor pedals will have a side chain feature, but those that do provide a significant advantage in terms of tone control and flexibility.
The statement above illustrates the importance of choosing a compressor pedal equipped with a side chain feature.
Having this feature exponentially expands the tonal palette that a guitarist can work with and control.
It is a crucial element in selecting the right pedal, especially if you intend to use the compressor in a broader music production context, beyond just guitar.
There’s a general misconception that side chain compression is only beneficial for electronic music genres.
But the truth is that it’s an extremely versatile technique that can add depth and character to any style of music.
For instance, you could apply side chain compression in a rock setting to allow the guitar to stand out during the most important riffs, without drowning out the bass and the drums.
In a more nuanced perspective, you could also use side chain compression to sculpt delicate fingerstyle tones, making sure that every picked note rings out clearly, with no loss of detail due to other overpowering frequencies.
The beauty of side chain compression lies in the fact that you can mold it to suit your needs, it’s not a preset effect with cookie-cutter applications.
Moreover, experimenting with side chain compression may lead to unexpected discoveries that could revolutionize your sound and push your creativity to new heights.
Of course, achieving mastery in side chain compression requires time, practice and a lot of trial-and-error, but the rewards are well worth it.
In a nutshell, employing side chain compression is a powerful strategy that can greatly improve your musical expression and help you utilize your compressor pedal to its full potential.
So don’t shy away from exploring this technique and remember, just as with any guitar gear or technique, the key to getting the most out of side chain compression is understanding its function and integrating it into your unique sound in a meaningful way.
13. Use Auto Mode for Consistent Sound
The inclusion of an Auto mode in a compressor pedal is a feature designed to maintain a consistent sound output regardless of input variations.
By switching on the Auto mode, you can simplify the compression process and save time during the sound setting process.
Emphasizing the importance of Auto mode, it perpetually observes your input signal and instantly makes the necessary adjustments to maintain a uniform output level.
Your Auto mode equipped compressor pedal is intelligently self-adjusting and it can automatically manage elements like attack and release times, thus balancing the sound.
This capability to automatically manage sound elements frees you from the need to consistently monitor and adjust settings manually, ensuring a stable and consistent output.
However, bear in mind that while the Auto mode provides consistency, it might not always deliver the perfect sound for every situation.
By watching the video embedded above, you may learn the effect of various compressor settings on the quality of sound produced.
It will also educate you more on how to manipulate different settings in real-time situations to achieve the desired tone and sound dynamics.
You should always experiment with your Auto mode in different musical contexts and understand how it interacts with various settings and sound inputs.
Having this type of hands-on experience with your gear is significant as it will allow you to make informed decisions when dialing in your desired tone and enhance your live or studio performances.
Remember, the Auto mode aims to make using a compressor pedal easier and more effective, but you’ll always need to have a basic understanding of the different elements at play.
Auto mode is perfect for those who want a ‘set and forget’ compression experience, but keep in mind that it does not negate the need to understand how a compressor works at its core.
An informed use of Auto mode will make you more in tune with your own sound and will help you to acquire the exact tone you’re looking for.
Finally, it’s important to note that different compressor pedals have different capabilities and characteristics in their Auto modes.
Try out different models and brands to find the one that is most suited to your musical style and preferences.
Thus, while the Auto mode brings consistency, it is not a replacement for understanding the core workings of a compressor pedal.
14. Combine with EQ for tonal shaping
One crucial arrangement for producing some quality and captivating music is learning to combine using a compressor pedal with an EQ system for tonal shaping.
This music production strategy is often underestimated but can drastically enhance your overall sound output when mastered.
Whether you’re a newbie or a professional, the combination of an EQ and a compressor can yield fantastic results. It allows you to shape your tone, boost or reduce particular frequencies, and control your dynamic range simultaneously.
On using a compressor with EQ, an essential first step is understanding the frequency range of your instrument.
This knowledge will enable you to apply the right amount of compression.
The combination of a compressor pedal and an EQ allows for a vital flexibility that can significantly enhance your sound output.
Indeed, when an EQ is paired with a compressor, you can accentuate or reduce certain frequencies before the signal hits the compressor, thus adding some considerable flexibility to your tone shaping process.
By emphasizing particular frequencies, you can control how the compressor reacts to those elements of your music, allowing your sound to have a distinct flair.
Additionally, using this combo can ensure your tone stays balanced. For instance, heavy compression can sometimes make the higher frequencies more prominent.
But with an EQ, you can reduce these heightened tones to maintain a balanced output.
Nevertheless, the effectiveness of combining a compressor with an EQ depends largely on the order you choose to arrange these effects.
Normally, placing the compressor before the EQ gives you more control over the dynamics resulting from EQ changes.
On the other hand, placing the EQ before the compressor can enhance the peculiarities of certain tonal attributes.
The option you pick will most likely be influenced by your specific artistic intentions or session demands.
Another aspect worth considering is how your EQ settings will impact your compressor’s behavior. Too much boost in the EQ can force the compressor into heavy compression, leading to an overly compressed sound.
Therefore, it is usually helpful to initialize with subtle EQ settings and then tweak incrementally until you achieved the desired tonal shape.
This way, you can ensure the compressor is only being influenced by the frequencies you really want to emphasize.
A careful combination of your compressor pedal with EQ is an invaluable addition to your music production arsenal.
It offers an incredible ability to shape your sound, providing a unique texture that distinguishes your music.
So, it is essential for any sound engineer, producer, or music enthusiast to master this strategy and apply it to get the best out of their creative process.
15. Use multiband setting for specific frequency compression.
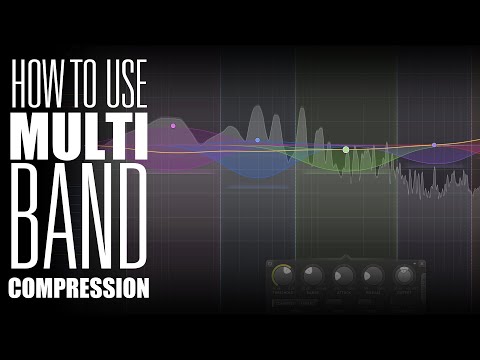
When it comes to using a compressor pedal effectively, one important strategy is to leverage the multiband setting for specific frequency compression.
In essence, a multiband compressor allows you to distribute your signal across various frequency bands, giving you the ability to apply different amounts of compression to each band.
This crucial aspect makes it possible to maintain control over the dynamic range of particular frequency ranges within the audio signal, rather than affecting the whole spectrum equally.
Multiband compression provides a high degree of control over individual frequency bands, allowing you to sculpt and shape your sound with precision.
As the emphasized quote suggests, you can use this approach to make subtle adjustments to your sound.
You can balance the lower end without squashing the high frequencies or fine-tune the mids without affecting the lows and highs.
This level of control is invaluable for achieving a balanced, nuanced sound.
To embark on the journey of mastering the use of multiband compression with a compressor pedal, you should start by identifying the frequency bands you wish to control.
Following identification, you then adjust the compression parameters (attack, release, ratio, and threshold) for each band independently.
Through this video, you will gain tangible, step-by-step insight into the use of multiband compression.
It offers practical demonstrations that will significantly aid your understanding and application of this powerful tool.
While the multiband setting may initially seem intimidating for beginners, its powerful capacity for sound shaping makes it a valuable tool in any musician’s toolkit.
You can use multiband compression to boost the fullness of a weak-sounding guitar, manage the harshness of overly bright cymbals, or even to clear room for the vocals in a mix.
In the realm of music production, it is often beneficial to compress some frequency bands more than others.
For instance, over-compressing the low-frequency content can make your mix sound weak and thin, while over-compressing the high-frequency content can lead to a mix that sounds harsh and edgy.
Exercising control over the different frequency bands gives you the power to ensure that all elements of your mix are clearly audible and balanced, thus resulting in a well-rounded and professionally polished sound.
A crucial tip for effective use of the multiband compressor is to always start with subtle adjustments, gradually increasing the amount of compression applied to each band.
Being heavy-handed with multiband compression can lead to unnatural sounding results.
Therefore, it is vital to exercise restraint and finesse when applying this tool.
The Bottom Line
Ultimately, the art of achieving excellent audio output relies heavily on understanding and effectively manipulating diverse elements of sound.
Enhancing or softening tone can be done by adjusting the attack level, while limitations can be maximized by setting a high ratio.
The fine-tuning of compression can be achieved with make-up gain and lighter compression rendered possible with lower ratios.
Additionally, sustain can be upped with extended release times and amplified even further when used in concert with distortion.
The use of knee control could lead to smoother transitions while blending dry and wet signals may be key to creating a finer sound.
For dynamic control, peak reduction is vital just as strategic threshold control is critical for noise reduction.

More than 10 years of experience playing and writing about guitars! When not writing, I can be found strumming away some Johnny Cash tunes. Favorite all time guitar is the Gibson Les Paul. #TeamGibson